Proxmox VE 建立虛擬桌面基礎架構(VDI)連線
Proxmox VE(PVE) 管理介面連線到虛擬主機(VM), 有兩種.
一種是novnc, 直接網頁登入pve, 就能點選vm中的console選項,進行連線如下圖所示

另一種方式, 透過spice連線, 日前我發現github上面有個專案 https://github.com/joshpatten/PVE-VDIClient 可以讓我們直接連到VM, 也就是所謂的虛擬桌面基礎架構(VDI) .
以下為安裝方式 (服務器設定, 以及用戶端設定)
Proxmox服務器設定
- 選定要VDI連線之vm, vm開機且登入後, 到 這裡 下載 spice guest tools 安裝, 安裝後關機

- 選擇要VDI連線之vm, 修改設定, 將display從default改成 SPICE

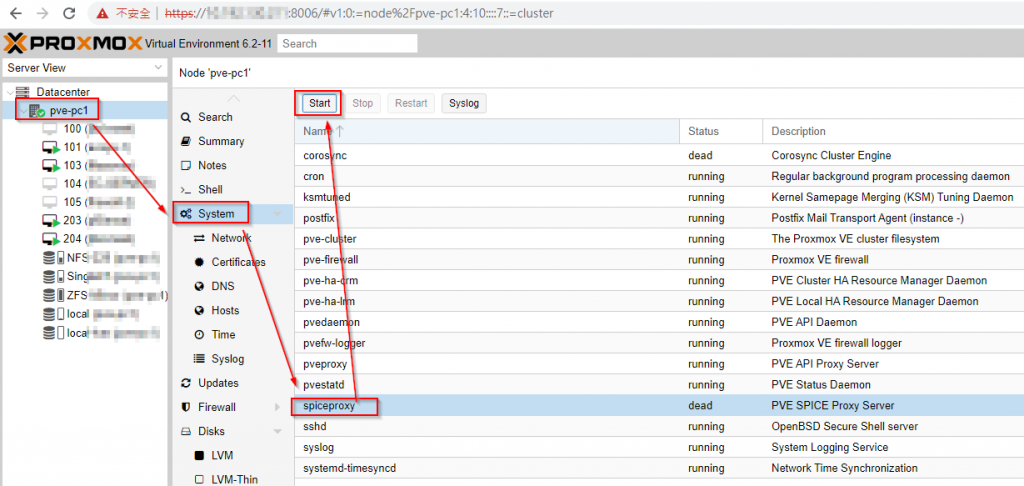
- 啟用pve服務器上spiceproxy service

- pve server新增vdi使用者

- 綁定vdi使用者使用指定之VM

用戶端安裝
- https://virt-manager.org/download.html
下載並安裝 vir-manager (virtual machine manager) - https://www.python.org/downloads/
下載並安裝python 3.10 或以上版本
下載後,執行以下指令
pip install pyinstaller
pip install proxmoxer
pip install PySimpleGUI
pip install requests
pip install pywin32- https://github.com/joshpatten/PVE-VDIClient/releases
下載並安裝PVE VDIClient
- 找出以下ini檔案(只會有一個)
%PROGRAMFILES%\VDIClient\vdiclient.ini
%APPDATA%\VDIClient\vdiclient.ini
修改如下, 請修改紅色部分, proxmox ve主機名稱或ip
[General]
# This is the title that is diplayed to the user
title = VDI Login
# This is the PySimpleGui Theme that is used. Run pvevdi.py with flag `--list_themes` for a list of themes
theme = LightBlue
# Program Icon
icon = vdiicon.ico
# Logo displayed on all windows
logo = vdiclient.png
# Enable Kiosk mode, which does not allow the user to close anything
kiosk = False
# Enable/Disable Fullscreen mode (not applicable in Kiosk mode)
fullscreen = True
# Enable displaying SPICE ini file before opening virt-viewer
inidebug = False
# Select which guest types to display. Acceptable values: both, lxc, qemu
guest_type = both

[Authentication]
# This is the authentication backend that will be used to authenticate
auth_backend = pve
# If enabled, 2FA TOTP entry dialog will show
auth_totp = false
# If disabled, TLS certificate will not be checked
tls_verify = false
# User name (if using token)
#user = user
# API Token Name
#token_name = dvi
# API Token Value
#token_value = xxx-x-x-x-xxx

[Hosts]
# Hosts are entered as `IP/FQDN = Port`
pve211.test.com = 8006
10.10.10.1 = 8006
[SpiceProxyRedirect]
# The Spice Proxy provided by the Proxmox API may need to have its host/port rewritten
# These rewrite rules are written `IP:port = IP:port`
# 1. Use the inidebug and read the current proxy=pve1.example.com:3128
# 2. Add your proxmox ip to the right side e.g. 123.123.123.123:6000
#pve211.hlmt.com.tw:3128 = 10.192.130.6:6000

#[AdditionalParameters]
# If you wish to define additional parameters to pass to virt-viewer you may define them here
# More parameter definitions here: https://www.mankier.com/1/remote-viewer
# Some Examples:
# Enable USB passthrough
#enable-usbredir = true
# Enable auto USB device sharing
#enable-usb-autoshare = true- 執行用戶端PVE VDIClient


pve8.2.4按教学操作后,连不是VM,提示“无法连接到图形服务器”
pve8可能會有異動,煩請再摸索看看
請問VDI有辦法結合windows AD的帳號嗎?
這可能要看一下Proxmox VE與AD整合
https://pve.proxmox.com/pve-docs/chapter-pveum.html#user-realms-ad